Exellent post from the University of Windsor.
All credits go to those guys!


Why do I get “Could not perform this operation because the default mail client is not properly installed” error message followed by dozens of blank Internet Explorer windows when I click on a mailto: link or a link in the Pure Message quarantined message digest?

It appears that after installing Internet Explorer 10 on a Windows 7 computer that had Lotus Notes or another mail client already installed, Internet Explorer 10 removes some registry entries that control what happens when a mailto: link is clicked. This results in the following error message:

Followed by dozens of blank Internet Explorer 10 windows.

To resolve the problem, you may run the following registry patch that will add the necessary Windows Registry keys back to the Windows Registry:

mailto.regmailto.reg

Alternatively, you may uninstall Internet Explorer 10 by going to the Control Panel, selecting “Uninstall a Program” (if using the category view) or “Programs and Features” (if using the icon view), selecting “View installed Updates”, then selecting Microsoft Internet Explorer 10 and clicking uninstall.

In Studio > Delivery Groups > Application > Application Properties > File Type Association, you see the list of file types associated with that application. If you check the desired file types and press OK, it works. The file types successfully associate. If, however, you select the desired file types and press “Apply”, studio does not save the information. I’m one of those people who always hits “Apply”, so I never even thought to try pressing OK.

This article is written by: Greg_Shields for http://www.itninja.com, the original article can be found here: http://www.itninja.com/blog/view/tips-for-troubleshooting-group-policy-preferences

All credits go to those guys!

Before the Group Policy Preferences were incorporated into the ‘Group Policy Ecosystem’, there were 18 things you could do with Group Policy. Group Policy Preferences adds another 21 on top of that.

For instance, you can deliver:

  • Shortcuts
  • Printers
  • Drive maps

And a lot more. But when one of these items should fail to work as expected, what are you going to do?

Well, first thing’s first: You’re going to use the previous blog articles to do generalized Group Policy troubleshooting. For instance:

  • Are you getting the GPO at all?
  • Do you have the policy linked to the right place?
  • Is the link disabled or enabled?

Once you’ve been through simple troubleshooting steps, you might need to bring out the ‘big guns.’

All of the Group Policy Preferences have a special logging mode called Group Policy Preferences Tracing.

In short, Group Policy Preferences Tracing gives you immense detail on what the Group Policy Preferences client side extension thinks is going on.

Here’s the basic steps to see this Group Policy Preferences Tracing feature in action.

First, create a new GPO and link it over to where you’re having problems. See how I’ve linked it to a place where Computers live (East Sales Desktops) and not where users live (like East Sales Users.) That’s because we’re troubleshooting the computer ‘ not a user.

Note, of course, that all the desktops will have this particular tracing turned on ‘ all at once. If this isn’t what you want, use a Local GPO to just affect one desktop.


Figure 1: Create a GPO to get started with Group Policy Preferences Tracing

Next, dive down into Computer Configuration | Policies | Administrative Templates | Group Policy | Logging and tracing as seen in Figure 2.


Figure 2: The ‘Logging and tracing’ node holds the Group Policy Preferences tracing options

Next, within Logging and tracing, look for the Group Policy Preferences item type you are having trouble with. For instance, in this example, I’ll pretend I had a problem with the Group Policy Preferences Shortcuts item type.

Find the item type in the Administrative Templates list as seen here then double-click to open it up.


Figure 3: The Group Policy Preferences logging and tracing options

Here is where you’ll be able to select Enabled, and then turn Tracing to On as seen here.


Figure 4: Enable the policy you need, then also turn Tracing On.

Once tracing is turned on, the very next time that Group Policy Preferences Shortcut item is run on the client machine, a log will be generated.

This log file will give ‘excruciating detail’ of what the Group Policy Preferences item (in this case, Shortcuts) thinks it’s doing. In Figure 5, you can see me running ‘gpupdate’ to refresh Group Policy, and then see the Group Policy Preferences trace file generated in c:\ProgramData\GroupPolicy\Preference.


Figure 5: Run GPupdate on the client machine, then see the log file generated.

If you open the log, you will see a huge list of what the Group Policy Preferences ‘thinks’ is going on. In my example, I have no problems. Indeed, my ‘error code’ at the end returned was 0x0000000 which usually means ‘all good.’


Figure 6: Example Group Policy Preferences tracing log.

But, if you had a problem, and needed to ferret it out, the Group Policy Preferences tracing log would be where to turn to if you had to.

DDNS

For DDNS to work properly, several requirements need to be met and configuration needs to be done.

The following is involved in DDNS.

  • The DHCP server
  • The DNS server
  • Host PC

DHCP Server

On the DHCP Scope properties, the following settings must be set. According to the environment, configuration may differ.

  1. DNS Settings
    DNS Settings
  2. If Appropriate, enable DHCP name protection.
    http://technet.microsoft.com/en-us/library/dd759188.aspx
  3. Scope options must be set
006 – DNS Servers DNS Server IP   addresses
015 – DNS Domain Name[1] DNS Domain Name =   Primary DNS Suffix

In the General IP settings of the DHCP server, under the advanced tab, DNS Dynamic Update credentials must be set. This account should be member of the Active Directory group: “DNSUpdateProxy”
dnsdynamicupdatecredentials

The advantages of using the DnsUpdateProxy group include:

  • Secure DNS updates can work with multiple DHCP servers: If all DHCP servers are added as members of the DnsUpdateProxy group, then the records of a server that fails can be updated by another server.
  • Upgraded clients can update their own records: The first user who is not a member of the DnsUpdateProxy group to modify the set of records that is associated with a DNS name becomes its owner, so when earlier version clients are upgraded they can take ownership of their name records at the DNS server.

http://technet.microsoft.com/en-us/library/dd334715%28v=ws.10%29.aspx

DNS Server

Requirements:

  1. Zone must be Active Directory-Integrated
  2. DNS Dynamic updates must be configured (insecure or secure)

Host PC

On the PC’s the following options should be set

  • Primary DNS Suffix or Connection Specific DNS Suffix
    The primary or connection specific DNS suffix can be set by GPO or by the DHCP scope options (check DHCP part)
    gpo1

These settings can manually be checked by requesting an ipconfig /all or opening the System Properties (sysdm.cpl). Choose to change the domain membership and press more…

  • Dynamic Update should be enabled
    gpo2

These settings can be checked by checking the network properties.

network settings


[1] The DNS Domain Name can also be set by GPO, see “Primary DNS Suffix”, also mentioned in the Host PC part.

Post from Technet: What is the Windows Server 2008 R2 / Windows 7 System Reserved Partition?

When you install Server 2008 R2, Windows Server 2012 (or Windows 7) to a fresh partition, sometimes you’ll receive the following message:

Then, after installation, when you inspect the disk configuration in Disk Management, you see this partition named System Reserved.  It’s 100MB in size and it doesn’t have a drive letter.  This 100MB partition is where the Windows boot loader resides.  This is needed if you’re going to implement Bitlocker.  Installation now by default, prepares the installation for Bitlocker.  This has changed from the Windows Vista / Server 2008 configuration where you have to prepare a drive to support Bitlocker.  The installation does not install Bitlocker, it just configures the server in the event you want to enable Bitlocker.  This is a much better plan than before.

The guidance for Vista, Windows Server 2008 was to create a 1.5GB drive to support the boot loader. In Windows 7 and R2, this drive now only needs to be 100MB.  Please do not mess with this partition unless you know what your doing (really).  Messing this up will render your OS unbootable.  The good news is that the repair tools in the install media can usually detect when the System Reserved partition has been damaged and will repair it.  If you’re not going to use Bitlocker, don’t worry, it’s only 100MB, and it is still beneficial in separating the boot loader from the OS.


Did you notice how warning during setup says Windows might create additional partitions?  If you’re not installing Server 2008 R2 (or Windows 7) on the boot partition, the install will probably not create the 100MB partition, it will probably put the boot loader on the boot partition.  Say you are setting up a dual boot between Windows Server 2003 and Server 2008 R2.  If Server 2003 is installed on Disk 0 of your server and you’re going to install R2 on Disk 1 of the machine, R2 will install the boot loader on the Server 2003 partition and setup a dual boot scenario during the install process.

Written by GPTeam, original can be found here.

How could something like CRUD be desirable? In Group Policy world, even the impossible becomes possible. In this entry, you’ll discover why Red does not mean Error and what the different colors mean when you make a Preference item. Read on!

Let’s talk about some of the intricacies of Preferences, specifically what we fondly refer to as CRUD options. Now, keep in mind, CRUD only applies to “stuff”, meaning things you can create and delete on the client, like mapped drives andshortcuts and printers. There are no CRUD options for things you just make changes to but don’t create, like “folder options”. More on this at the end.

Despite it’s unfortunate acronym, CRUD is very useful. It is also the reason those little spots of color get associated with you new Preference items. Select one of the four actions from the drop down menu to choose between Create, Replace, Update, and Delete. That decides how your Preference item will be pushed onto the client. Let’s take drive mappings as an example.

image


This is the Preference item

(in UI)

image

(in XML)

image

Now, under the “Action” drop down, you have four options :  Create, Replace, Update, Delete

image

Create – If a drive mapping doesn’t exist for this user for the share “\\share\userDocuments\”,  then create one. If there already is one, don’t do anything! It’s a kind, gentle sort of policy, it won’t overwrite anything you already have, so it has a Green icon associated in the UI.

Replace – Remove whatever drive mapping exists for this share, and create a new one with these settings. If there isn’t one, just create it. No matter what, you’re getting this drive mapping, whether something existed there or not. It’s very insistent, like the bully of the CRUD options, so it gets a Red icon.

Update – Yellow – If that drive mapping exists, it will be updated with the settings specified here. If there are other settings associated with the drive mapping that aren’t specified here, they will be maintained. If no drive mapping exists for this share, create it. Nothing gets blasted away like with the Replace setting, but there is still a chance that you’ll overwrite something, so it gets a Yellow icon (warning! make sure you know what you’re going to be over-writing!).

Delete – X mark – If that drive mapping exists, it will be removed. That’s it, it’s just removed, so it gets an ‘x’ icon. It does not roll back, it gets deleted.

What did we learn? Red does not mean error! X marks the (delete) spot. Another picky note is that if you choose the “remove when no longer applicable” option under the common tab, it’ll force the CRUD action to Replace.

So, really, I’d recommend reading the help associated with each Preference item to make sure you know what you’re doing.

Hope that helps!

liliaG aka @superlilia

P.S. The end! Here’s more on my stuff vs. state discussion. Stuff means something that can be created or deleted on the client machine / user account. Think of at is as something you can see appear. It has a new icon that becomes associated with it: when you add a new printer, an icon appears that looks like that printer in your Devices window. When you add a shortcut to the desktop, that shortcut appears. Similarly, when you remove a local security group, it is gone, the icon is removed, the group no longer exists. That doesn’t mean that not all local security groups are gone, just that instance of one.

State is a state of being, like folder options. You can’t “create” a folder options, but you can make changes like “Show all hidden files”.

GP Preferences has both of these types of things, but CRUD only applies to the stuff bits. You can’t configure CRUD forstate, and the UI isn’t there to let you try.

P.P.S. Here’s the help in the product:

image

Written by Darren Mar-Elia

Darren Mar-Elia is a Microsoft Group Policy MVP, creator of the popular Group Policy site—www.gpoguy.com
and coauthor of Microsoft Windows Group Policy Guide (Microsoft Press, 2005).
He is also CTO and founder of SDM Software, Inc.

AT A GLANCE:

  • Monolithic vs. functional GPOs
  • How to process group policy entries
  • What happens when GP changes occur

I am frequently asked the question, “From a performance perspective, is it better to have fewer, bigger GPOs or a lot of smaller ones?” That question and others related to Group Policy design and performance are the focus of this article. And, as with most sweeping questions,

I can tell you the answer in advance: “It depends.” While this may seem evasive, my goal is to illuminate the mechanisms that underlie Group Policy processing so you can make informed decisions about your Group Policy design, regardless of whether you are just starting out or looking to optimize an environment with hundreds of existing GPOs.

Monolithic vs. Functional GPOs

Let’s start by describing the different ways you can implement your GPOs. The terms “monolithic” and “functional” refer to how you design them. Monolithic GPOs contain settings from many different areas. For example, a monolithic GPO might contain settings from Administrative Templates, Internet Explorer Maintenance, and Software Installation policies—all within a single GPO. By contrast, functional GPOs typically do one thing. For example, a functional GPO may do only Software Installation or enforce Security settings. I’ve even seen functional GPOs that contain only one policy setting! But that is probably the extreme. Figure 1 shows some of the advantages and disadvantages of each approach.

                          Figure 1 Comparing monolithic and functional GPOs

Issue Monolithic GPOs Functional GPOs
Delegation/Isolation Difficult, since each GPO   can contain settings from multiple areas, and you can only delegate at the   GPO level, not the settings level. Easy, since each GPO   contains a single policy area, you can delegate, for example, the software   installation GPO to the deployment administrator, the security GPO to the   security officer, and so on.
Manageability & Complexity Potentially simpler and   easier to manage, because each GPO contains all settings in a single place. Potentially more   difficult because more GPOs mean more places to look to track down problems   and more complexity determining the resultant set of policy for a given user   or computer.
Performance Potentially slower   because, for a given client-side extension, if one GPO changes, all   extensions would need to run against all GPOs in scope. Depends upon how many   GPOs are in use, and how often they change. Performance could be better in   dynamic environments compared to monolithic GPOs.

As you can see, there is no cut-and-dried answer to which approach—monolithic or functional—is best in all cases. In your environment, you will likely need both. For example, you might find the functional approach preferable when you are creating security policy for your entire domain. Having a single GPO that contains only security settings makes it easy to delegate control of that GPO to your security administrators where no one else can touch it. By the same token, if you delegate GP administration to OU administrators, then establishing one monolithic GPO for each OU gives those administrators a single place where they can go to manage all of their policy settings. That can reduce complexity for them and allow you to moderate the number of GPOs created for a given OU’s users and computers.

How do these high-level design decisions affect the performance of Group Policy processing, and how can you make smart decisions about GP design that minimize performance impacts? The first step in maximizing the performance of your Group Policy infrastructure is understanding how Group Policy processing works under the covers.

Understanding Group Policy Processing

Group Policy processing is a complex set of interactions involving many pieces of your Windows®and Active Directory® infrastructure. At a high level, there are two parts to Group Policy processing. The first is called Core, or Group Policy Infrastructure processing. In this phase, a Windows Group Policy client queries its closest domain controller to determine what the link speed to the DC is, where it lives in the Active Directory hierarchy (that is, which site, domain, and OU the client is a member of), and which GPOs apply to the computer or currently logged-on user. (It’s important to note that in this context a client could be a server or workstation participating in an Active Directory domain.) Once the list of GPOs has been created, the next phase kicks in—Client-Side Extension (CSE) processing. During the CSE phase, each registered CSE processes the list of GPOs that have implemented settings in its area. For example, the Registry or Administrative Template CSE runs first in all cases and processes all GPOs that apply to the given computer or user and that have implemented registry policy within them.

The list that follows details the steps the Group Policy processing cycle goes through, including network interactions between the client and domain controller. It’s important to remember that Group Policy applies to both computers and users. Therefore, each time policy processes—for example during a background refresh of Group Policy—the cycle I enumerate below will be repeated for both the computer and the currently logged on user account on a given system, since each can have a different set of policies applying to them. When this happens, Windows actually performs the processing cycle simultaneously for both computer and user, with each cycle running on a different thread within the Group Policy engine process. (The Winlogon process for Windows 2000, Windows XP, and Windows Server® 2003, and the Group Policy Client service in Windows Vista® and Windows Server 2008.)

Processing a GP is a six-step procedure:

  1. The client performs Internet Control Message Protocol (ICMP) slow-link detection to a domain controller in its site to determine link speed. In Windows Vista, the use of ICMP for slow-link detection is replaced by the Network Location Awareness (NLA) service.
  2. The client reads CSE status information from its local registry to determine which GPOs were processed last.
  3. The client uses LDAP to search the gpLink attribute in Active Directory on each container object within its location in the Active Directory hierarchy—first at the OU level (including all nested OUs), then at the domain, and finally at the Active Directory site level. From the results of this search, it builds a list of GPOs that must be evaluated for processing.
  4. Each GPO is then searched in Active Directory to determine whether the client (user or computer) has the necessary permissions to process it. Its version number, the path to the Group Policy Template (GPT) portion of the GPO in SYSVOL, and what CSEs are implemented in that GPO are also evaluated.
  5. The client then uses the Server Message Block (SMB) protocol to read the contents of the GPT and get the GPO’s version number from the gpt.ini file. The version numbers in the Group Policy Container (GPC) and GPT are one factor that is used to determine whether a GPO has changed since the last processing cycle.
  6. Each CSE runs in the order that is registered under HKLM\Software\Microsoft\Windows NT\CurrentVersion\Winlogon\GPExtensions, and processes the GPOs that implement that CSE if the GPO has changed since last processing cycle (as determined during core processing). Each CSE also logs Resultant Set of User Policy (RSOP) data to Windows Management Instrumentation (WMI) during each refresh, if available.

Let’s dissect this process and look at how performance can be impacted. The first thing to realize is that there is a difference between foreground and background processing. Foreground processing occurs for computers during a system restart and for users during a user logon. Background refreshes occur on workstations and member servers by default every 90 minutes plus up to 30 minutes in a randomized value. Background refreshes occur on domain controllers every 5 minutes by default. In Windows Vista, you can also have NLA-based refreshes, which are essentially background refresh events that are triggered by a previous failure of Group Policy processing due to the lack of access to a domain controller (as when the client was offline when a background interval occurred). Why are these distinctions important? Primarily because certain CSEs (for instance, the Software Installation and Folder Redirection CSEs) will not run during a background refresh. Likewise, logon/logoff or startup/shutdown scripts do not run during a background refresh.

Similarly, in Step 1 of this process, I mentioned the slow-link detection process. In pre-Windows Vista systems, this process relies on clients using ICMP to ping the domain controller to determine its availability and link speed. If the calculated link speed falls below a certain threshold value (the default is 500Kb/s) the link is considered to be slow and, again, certain CSEs, such as Software Installation, Folder Redirection, and Internet Explorer Maintenance, will not run. All of these conditions can have an impact on performance as well as on the expected delivery of policy.

Probably the aspect of the policy processing cycle with the greatest impact on performance is the logic that determines whether GPOs applying to a computer or user have changed. The Group Policy engine has a built-in optimization that says that if nothing has changed for a computer or user since the last time GP was processed, then no processing occurs. This can obviously have a tremendous impact on the time it takes your clients to process policy, especially if your GP environment is fairly static. Let’s look in more detail at what constitutes a change.

When Group Policy Change Occurs

So, what constitutes a change in terms of Group Policy processing? There are a number of factors but the most obvious is that if you make a change to a GPO, clients processing that GPO will detect the change and reprocess that GPO. How does a client know that a GPO has changed? It relies on version numbers on the GPO and within the client to figure it out.

A GPO is composed of two pieces—the GPC stored in Active Directory under the CN=Policies, CN=System container within each domain, and the GPT stored in SYSVOL under the “Policies” folder. Each piece of the GPO contains a version number. For the GPC, this version number is stored in the versionNumber attribute on the GPC object. For the GPT, it’s stored within the gpt.ini file at the root of a given GPT. The client also keeps a record of the version numbers of the GPOs it has processed (both per-computer and per-user) within its registry. This version information is held under HKLM\Software\Microsoft\Windows\Currentversion\Group Policy\History for the computer and HKLM\Software\Microsoft\Windows\Currentversion\Group Policy\<SID of User> for the user on each client.

When Group Policy processing occurs, one of the parts is to examine the version numbers of all GPOs that the computer or user are subject to and compare them to any processed during the last cycle, as found in the registry. If any of the version numbers of the current GPOs are different (note that they only have to be different—they could be bigger or smaller!), those GPOs will be processed during the current processing cycle. If not, they are not processed unless one of the other change conditions are met. Those other change conditions are as follows:

  • A change in the list of GPOs that apply to a user or computer (a GPO has been added or removed)
  • A change in the security group membership of a user or computer
  • A change in a WMI filter linked to a GPO (a WMI filter has been added or removed)

If any of these change conditions are met, the client will reprocess policy during that cycle. But there are subtleties in this process that you need to be aware of, since they can have a significant impact on performance. For a given CSE, if 1 GPO out of 10 changes, then all GPOs must be processed for that CSE. Remember that processing happens on a per-CSE basis. However, CSEs must process policy in the order of precedence that controls processing (local GPOs first, then site-linked GPOs, then domain-linked GPOs, then OU-linked GPOs). Given this requirement, let’s say a user has 10 GPOs that apply, each linked at different levels of the Active Directory hierarchy. And let’s say that each of those 10 GPOs implement some Administrative Template policy settings. Now, an administrator comes along and changes a GPO linked to the domain—adding a new Administrative Template policy setting. Then the computer or user goes to process policy and notices that the version number of that changed GPO is greater than the last time it was processed, so the GPO needs to be processed again. But in order to maintain the order of precedence of GP processing, it must process all of the Administrative Template settings that apply to all of the GPOs. So a simple change to one GPO can have a potentially significant performance impact for that client.

Comparing Performance of Monolithic and Functional GPOs

Now that we’ve looked at the processing cycle and at how changes to your Group Policy environment impacts processing, let’s loop back to our discussion of monolithic versus functional GPOs and how each approach impacts performance.

Monolithic GPOs can have a hidden performance penalty due to the way Group Policy versioning works. The reasons for this are not altogether obvious, but they have to do with the fact that there is no concept of per-CSE versioning within Group Policy processing. Let’s say a user has three GPOs that apply to him. Each GPO is monolithic in that it implements several policy areas. For example, let’s assume that each GPO implements Administrative Template policy, Software Installation policy and Folder Redirection policy. Now let’s say that an administrator makes a change to Administrative Template policy in one of these GPOs. Its version number is advanced by that change. Then the user comes along and processes Group Policy. The Administrative Template CSE starts up and sees that one of the GPOs has changed, so it processes those three GPOs again.

When the Software Installation and Folder Redirection CSEs run, they also look at the GPO version numbers and notice the new version number on one of the GPOs. But because that version number doesn’t tell them about what policy area was changed in that GPO, they go ahead and process all three GPOs again, just in case. The result is that, in a monolithic GPO implementation, making changes to one area of policy can cause processing activity in another area.

True, in the case of software installation or folder redirection policy, those CSEs may not actually perform any work because, for example, if an application has already been installed it’s not going to be installed again. But the point is that this behavior can happen with any CSE and should be taken into account when you are designing monolithic GPOs. If you have a policy area that changes frequently, you might consider keeping GPOs that implement that policy area separate from other policy areas.

From a functional GPO perspective, the performance considerations are more obvious. If you have more GPOs per user or computer (because the functional approach typically involves more GPOs for a given set of policy settings), it means that the Group Policy engine has to spend more time enumerating those GPOs during the core phase of Group Policy processing. However, as we’ll see in the next section, this may not necessarily impact performance in a significant way.

Measuring Group Policy Performance

Ultimately, in order to make good decisions about the performance of your Group Policy infrastructure, you need to be able to measure how Group Policy is performing in your real-life environment. Modeling or predicting Group Policy performance is nearly impossible, given the large number of factors that can impact a given processing cycle. For that reason, empirical measurement is your best bet for discovering if GP processing performance is a problem. What constitutes bad performance? Well, bad performance is any situation where Group Policy processing impacts your users’ experience on their systems. This may be different for every organization, but the key is knowing you have a problem.

So how do you measure the duration of a given Group Policy processing cycle? Well, again, the answer is not simple. If you are running Windows Vista or Windows Server 2008, you can take advantage of the new Event Viewer Operational Logs. The Group Policy operational log within the Event Viewer, found under Applications and Services Logs\Microsoft\Windows\Group Policy\Operational, provides excellent instrumentation of each step of the Group Policy processing cycle, including time spent during each phase of processing (see Figure 2).

Figure 2 Group Policy Operational Log Event showing policy processing time (Click the image for a larger view)

However, if you are not working in a Windows Vista or Windows Server 2008 environment, the mechanisms for measuring policy processing times are less direct. In that case, your choices are to enable verbose userenv logging (see the Microsoft support article atsupport.microsoft.com/kb/221833) and view the timestamps within that file for a given processing cycle, or to use the values held in the registry on the client that indicate start and stop times for policy processing. These values are stored in the following for the computer

HKLM\SOFTWARE\Microsoft\Windows\CurrentVersion\
Group Policy\State\Machine\Extension-List\
{00000000-0000-0000-0000-000000000000}

and here for the user:

HKLM\SOFTWARE\Microsoft\Windows\CurrentVersion\
Group Policy\State\<SID of User>\Extension-List\
{00000000-0000-0000-0000-000000000000}

The values are stored in FILETIME format and must be converted to a normal date and time. You can also use the free GPTime.exe utility I wrote (available at gpoguy.com/tools.htm#GP_Time_Utility) to get the same information.

If you don’t have a Windows Vista or Windows Server 2008 environment, but do have access to a userenv log, you can still get valuable information about how much time has been spent in each policy processing cycle. For example, Figure 3 displays a snippet of the userenv log showing part of the core phase of Group Policy processing.

Figure 3 A portion of the userenv log (Click the image for a larger view)

Note that each line of the log file includes a timestamp. The core part of the Group Policy processing cycle begins when you see an event that says something like “ProcessGPOs: Starting user Group Policy (Background) processing …” The CSE part of the processing cycle begins when you see the line “ProcessGPOs: Processing extension Registry.” You can use this log and the timestamps within it to determine how long each part of a policy cycle takes.

General Observations on Performance

When you spend enough time looking at userenv log files, you begin to see patterns emerge, and though you can’t predict how long policy processing will take, you can start to make some general observations about where time is spent in a given processing cycle. For example, during a policy processing event, when policy changes are being processed and CSEs have work to do because of a change, the time spent in the core part of GP processing is typically much smaller compared to the CSE part.

This is true for most policy areas because most CSEs need to perform tasks that run longer than the core portion of their processing, whose most expensive operations are querying Active Directory and SYSVOL. For example, there’s no comparison between time spent in core processing versus the Software Installation CSE running a Microsoft® Office install. However, for a normal background refresh of policy where nothing has changed since the last cycle, the core part of the processing cycle takes roughly the same time as the CSE portion. The exception to this is registry policy processing—which is actually fairly fast unless you have tens or hundreds of registry policy settings in place for a given user or computer.

In addition, disabling the computer or user side of a GPO because it is unused has little effect on policy processing performance. If a policy side is unused, the only overhead will be in querying Active Directory to determine that, and the same query must be performed to view the disable option as the one that occurs to determine whether any CSEs have been implemented for that side of the GPO. The effect of disabling a side is negligible.

Design Recomendations for Optimal GP Performance

Now that we’ve looked at many aspects of Group Policy processing performance, there are some design recommendations that can directly impact performance. These are summarized in four key points.

  1. If you are making frequent changes to your GPOs, keep in mind the effect mentioned earlier, where a change to one CSE can impact the processing of all CSEs. To that end, if you plan to make frequent changes to, for example, registry policy, it makes more sense to put your registry policy into functional GPOs (GPOs that only do registry policy) as that will isolate other CSEs from processing when changes occur.
  2. When thinking about how many GPOs are too many, keep in mind that policy processing only occurs during changes, and “expensive” CSEs like Software Installation, Folder Redirection, or handling a large number of registry policies or setting permissions on large file or registry trees take up the most time. The time spent querying Active Directory for the list of GPOs during core processing is often the smallest part of the processing cycle. So, 30 GPOs that apply to a given user but do minimal registry policy changes and don’t change frequently could take less time to process than 5 GPOs that are running expensive CSEs on a regular basis because those GPOs are changing frequently.
  3. Avoid behaviors that force obvious slowdowns in policy processing performance. For example, you can set policy to force CSEs to process even if a GPO has not changed (under Computer Configuration\Administrative Templates\System\Group Policy). However, if you do this, expect policy processing to take longer during each cycle.
  4. Keep in mind the trade-offs of disabling Fast Logon Optimization in Windows XP and Windows Vista (this is done by enabling the policy at Computer Configuration\Administrative Templates\System\Logon\Always wait for the network at computer startup and user logon). When this policy is enabled, foreground processing switches from asynchronous to synchronous. This means that computer and user policy must run to completion before the user gets control of the computer and desktop. However, it can also be beneficial because it gets around the problem of requiring two or more restarts or logons for Software Installation and Folder Redirection policy to take effect.

Wrap-Up

While Group Policy processing performance is not an exact science, there is some insight you can bring to your design process that can mitigate performance issues.

Understanding how the processing cycle works and where time is spent can go a long way toward tracking down performance issues. Use the Windows Vista or Windows Server 2008 Operational logs (or userenv logs in earlier versions of Windows) to get instrumented information about the processing cycle. Keep in mind the vagaries of CSE processing and what constitutes a change in policy from a CSE perspective. And remember that, in dynamic environments with lots of changes, functional GPOs may make more sense than monolithic ones. But the bottom line is that Group Policy is a technology designed to help you better manage your Windows environment. It’s very important that your business needs drive your Group Policy design rather than the other way around. Keeping in mind some of the performance behaviors discussed here can help you accomplish that goal

Excellent post from Eric Lawrence, original can be found here, all credits go to him

Over on the Microsoft Answers forum, some folks have reported that Internet Explorer doesn’t remember their login details. This is a tricky problem to troubleshoot because there are a number of different problems which get lumped together under this description, and there are a number of different causes for each problem.

Let’s break down the commonly reported problems into two cases:

  1. IE’s Web Forms Password Manager doesn’t work.
  2. Clicking “Remember me” on websites doesn’t work.

The following two sections will discuss each problem and possible causes and solutions.

Troubleshooting IE’s Forms Password Manager

Internet Explorer actually has two password managers: the WinINET-provided password manager that remembers HTTP authentication credentials, and an IE-specific password manager that remembers passwords typed into web forms. For the purposes of this post, we’re only going to be talking about the second one.

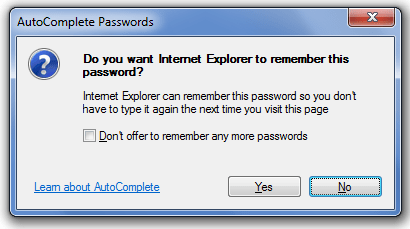
The Forms-Based Password Manager prompts you to save your password when it recognizes that you’ve filled in a login form. The prompt looks like this:

Autocomplete password prompt

…in IE6,7, and 8. In IE9+, it is replaced by a notification bar at the bottom of the screen that offers the same options.

If you do not see this prompt, there are several possibilities:

  1. You have disabled AutoComplete in your browser by checking the “Don’t offer to remember any more passwords” box.
  2. The page has explicitly disabled AutoComplete by using the AUTOCOMPLETE=OFF attribute.
  3. The HTTPS-delivered page implicitly disabled AutoComplete by returning a HTTP directive forbidding caching. See below
  4. Internet Explorer didn’t recognize that the page had a login form.
  5. The login form was submitted using JavaScript.
  6. You previously said “No” when prompted to save your password for this username on this page.
  7. The Administrator disabled AutoComplete in your browser using Group Policy.
  8. The login form was created by JavaScript using the createElement API.
  9. You didn’t type any letters in the Username box (using drag/drop or copy/paste instead)

You can resolve problem #1 in IE by clicking Tools Internet Options > Content > Autocomplete > Settingsand checking the User names and passwords on forms and Ask me before saving passwords checkboxes.

Issues #2 to #5 are under the control of the website, although most users won’t know that (I’ve mentioned this before). There is no way for the user to resolve these problems short of asking the website to update their page.

Update: Issue #3 is only a problem for AutoComplete of non-login forms. Here’s a test page showing that AutoComplete of username and password in login forms works properly even on no-cache HTTPS pages.

Case #4 is an interesting one. One possibility is that IE doesn’t “see” the login form at all, for instance, because it was written using Adobe Flash, Silverlight, Java, etc). Another possibility is that IE doesn’t “recognize” the form as a login form, because it contains more inputs than expected. For instance, Facebook uses a fancy login form that shows the cue text “Password” in a INPUT TYPE=TEXT control (named “Password_Placeholder”) until the user puts their cursor in the box. When they do, Facebook uses CSS to hide the password_placeholder box and replaces it with a INPUT TYPE=PASSWORD box into which the user types their password. Unfortunately, while it’s hidden by CSS, the placeholder is still a part of the form, and hence it’s submitted with the form. Because of this extraneous INPUT TYPE=TEXT control, IE assumes that this isn’t a login form and does not offer to save the password. (Using Fiddler, I modified the Facebook homepage to change the placeholder control to INPUT TYPE=HIDDEN and confirmed that this fixed the problem). Update: Facebook fixed this problem in October 2009.

Case #5 is another interesting one. If you submit a form using the JavaScript submit() method, AutoComplete will not offer to save the password. I’ve built a simple test page which demonstrates this. If you use the standard INPUT TYPE=SUBMIT button, you’ll be prompted to save your password. If you use the button which calls the .submit() method, no prompt is shown. To workaround this issue, web developers can call the AutoCompleteSaveFormmethod.

Case #6 is a tough one. If you previously elected not to save your password for this username for this page , then that “Don’t Store” preference is retained and you will not be prompted to save the password for this username in the future either. There’s no “good” workaround for this.

Update: There is now. 🙂 See https://blogs.msdn.com/b/ieinternals/archive/2010/04/09/restoring-the-internet-explorer-password-autocomplete-prompt.aspx

You can delete ALL of your passwords using the Tools > Delete Browsing History option, and this will reset all password decisions back to prompt– but doing this will wipe all of your passwords for all sites.

If you’re a technical user, there’s a geeky way to get the prompt back for a specific page:

  • Get RegMon or ProcMon from SysInternals
  • Set a filter to watch the registry key containing the word “Storage2” without quotes.
  • Visit the page for which autocomplete information should be stored.
  • Watch which subkey within the Storage2 key is opened.
  • Delete (or rename) that key to remove any stored passwords or “don’t store” decisions.

Case #7 occurs when your Administrator uses Group Policy to disable the AutoComplete feature. To see the Group Policy settings, click on Start and type gpedit.msc to launch the Group Policy viewer. Browse through to User Configuration, Administrative Templates, Windows Components, Internet Explorer. Check the policies for “Disable Autocomplete for Forms” and “Turn on the auto-complete feature for user names and passwords on forms.” Alternatively, close IE, start Process Monitor, and filter for registry reads of keys containing the word FormSuggest.

Case #8 is something I didn’t learn about until July of 2011. It turns out that most browsers (IE9, Firefox 5.01, Chrome 13) don’t work properly when a login form is created dynamically using the createElement API. Here’s atest page. Only Opera works properly with this test page. For what it’s worth, if the test page injects a script-created form by injecting markup using innerHTML, it appears to work correctly in IE.

Case #9 is something I didn’t learn about until June of 2012. If you copy/paste or drag/drop the text into the username box without ever typing any letters (even if you deleted them later), then you will not be prompted to save the password.

Note: If you see the prompt in IE9 but it immediately disappears the problem is likely that your login page immediately navigated to a page on a different domain. Many of IE9’s notification bars, including this one, go away automatically when navigating to a different domain.


If, on the other hand, you do see the Save Password prompt, but the password doesn’t seem to autofill, there are several possibilities:

  1. The website’s login page uses paths that contain unique or changing tokens
  2. The website’s login page deliberately randomizes the name of the form fields
  3. Your stored passwords are being cleared between visits

The Forms password manager is designed to recognize when you’re revisiting a login form for which you’ve previously stored a password. When you enter a username for which you’ve stored a password, the password should automatically be filled in the appropriate box.

A key point here is that IE must recognize that this is a form for which you’ve stored a password. IE’s password manager takes into account the URL (specifically the hostname + folder path + filename, not including the query string or fragment) and the name of the form fields. If the website changes these values (for instance, it stores a session identifier as a “virtual” folder in the URL), then IE will not recognize a revisit the login form and will not fill the password. Similarly, if the website changes the names of the HTML input controls, IE will not fill the password. I have encountered several sites which suffer from one or both of these problems.

Lastly, it’s possible that your stored passwords are simply being deleted. IE includes a number of features that allow you to delete your browsing history, including your stored passwords. Make sure that you have the checkboxDelete browsing history on exit checkbox unchecked inside Tools Internet Options > General . Also, if you use the Delete Browser History command, you should uncheck the Passwords checkbox or you will lose your stored passwords. Notably, the Preserve Favorites Website Data checkbox at the top of this screen will notpreserve your form data, including passwords. (Interestingly, it’s impossible for the feature to keep form data. Only URL hashes are stored in the registry, so the feature cannot determine whether a piece of stored form data belongs to one of your favorite sites).

Troubleshooting Login Cookies

Other users have encountered problems where a website offers a “Remember me” checkbox but that checkbox doesn’t seem to work. There are a number of possible reasons for this:

  1. You checked “Remember me” while in IE’s InPrivate browsing mode
  2. Your cookie settings restrict the server’s ability to set persistent cookies
  3. Your browser zones configuration is incompatible
  4. Your browser isn’t patched
  5. The website’s security policy requires an occasional login
  6. The website’s cookies are being cleared

Problem #1 is simple enough– “Remember me” features typically require the server to set a persistent HTTP cookie to store your authentication information. When you are browsing in IE8’s InPrivate Browsing mode, all persistent cookies are automatically downgraded to session cookies that expire on browser exit. Also, when the browser starts an InPrivate Browsing session, the cookie jar starts out empty for that session. So, you should not expect “Remember me” to work if you either are in an InPrivate session, or checked the box in such a session.

Problem #2 occurs if you’ve adjusted your cookie settings inside Tools / Internet Options / Privacy. If you’ve changed these settings from the defaults (or if the site is constructed in an unconventional way) the site may not be permitted to save persistent cookies at all. When this is the case, the site will not be able to set persistent cookies and hence the “Remember me” feature will not work.

Problem #3 occurs on Windows Vista and above, when you have configured one subdomain to run outside of Protected Mode (e.g. put it in the Trusted Zone) and another related subdomain to run inside of Protected Mode (e.g. left it in the Internet Zone). This isn’t terribly common, but might occur if you, for instance, putlogin.live.com in the Trusted Zone but didn’t put mail.live.com in the Trusted Zone. The root cause of this obscure problem is that Protected Mode and non-Protected Mode do not share cookies, and hence a cookie set by a site outside of Protected Mode will not be visible to a site running inside Protected Mode, and vice versa.

In some cases, this can lead to even worse problems. For instance, consider the case where you puthttp://www.google.com in the Trusted Zone and visit http://www.gmail.com . If you then try to log into GMail, you will be redirected endlessly, as the login host redirects you to the application host (since the login page has the cookie and believes you’re logged in), and the application bounces you back to the login page (because the application doesn’t see your login cookie). Servers can prevent such loops by passing querystring parameters when redirecting so the destination knows not to immediately redirect back in a loop.

Update: I wrote a longer post about problem #3 here.

Problem #4 relates to obscure cookie-related issues in IE7 which were fixed in subsequent patches. Ensure you have the latest updates for your browser using WindowsUpdate.

Problem #5 is that some sites (particularly secure sites) will require that you periodically (e.g. every week or month) re login  to help limit the risk of misuse of your credentials. Sometimes, sites will track which IP address you use to log in, and if your IP address changes (e.g. you move from one network to another with your laptop) your cached login cookies will be considered invalid.

These cases are tricky to troubleshoot because there’s no indication to the client (unless the server explicitly provides an indication) that you sent a legitimate stored cookie but security policy requires periodic re-login. You can usually only determine that this is the problem by using a network monitor (like Fiddler ). Unfortunately, even that form of troubleshooting is difficult because unless you happened to have Fiddler running at the time of the prompt, it’s usually too late (because the login form will often itself wipe your “outdated” cookie).

Problem #6 is the most common problem—the website’s cookies are simply being cleared. As noted above, there are a number of ways that this can happen: you may have IE configured to delete cookies on exit (see the checkboxDelete browsing history on exit checkbox unchecked inside Tools Internet Options > General) . Or, perhaps you’ve deleted browser history manually using the Delete Browser History command. It’s also possible that your cookies are being cleared by another piece of software, for instance, security or privacy utilities.

Reporting Problems

If you find yourself encountering a problem with stored passwords, gathering the following information will help troubleshooters:

  1. What is the URL of the login page?
  2. Is the problem that you don’t see the “Save password” prompt?
  3. Or, is the problem that you do see the “Save password” prompt but it doesn’t seem to work?
  4. Or, is the problem that a “Remember me” box in the web page doesn’t seem to work?
  5. Have you added any sites to the Trusted Zone?
  6. Inside the Tools Internet Options > Privacy screen, is the Default button disabled? If you click the Sitesbutton, is the sites list empty?
  7. What addons are listed inside Tools Manage Add-ons ? Do you have the “Windows Live Sign-in Helper” installed, for instance?
  8. Are you running any 3rd-party security or privacy utility software?
  9. If the problem is a “forgotten” login stored using “Remember me”—when did you last log into the website? Was that login from the same computer, in the same location?

While troubleshooting login problems can be quite tricky, in most cases problems are resolved by relatively simple configuration changes.

Where to look for and how to solve the most common print spooler problems

Written by George Sas, edited by: Bill Fulks

On the Microsoft Windows operating systems, the Print Spooler is the service responsible for managing the print jobs sent by the computer to the printer. The Print Spooler service will retrieve the print jobs from the client computer, determine which printer driver to be used for each print job and load that printer driver and print the job to the printer. Also if there are more than one print jobs in the queue the printer spooler will also take care of queuing the print jobs and temporarily store the print jobs on the print server computer before they are sent out to the printer. All in all, the Printer Spooler is the program that will take care of all the print jobs. As the print jobs are spooled on the printer spooler before they are sent to the printer, the user can pause, restart or delete print jobs.

When troubleshooting Windows 7 Print Spooler problems, one must be aware of a few key components:

  • Print Spooler Folder
  • Print Spooler Service
  • Printer Drivers

This are the key components you have to keep an eye with when trying to solve any printing issues as this are the most common factors that will cause the Windows 7 Print Spooler to crash.

Printer Spooler Folder

The most common location for this its C:\Windows\System32\spool (depending on your Windows installation folder). You can always access this folder by going to Start > RUN and type in “%SystemRoot%\System32\spool” or simply navigate to this folder with the Windows Explorer. Within this folder you will see a few subfolders like: PRINTERS and DRIVERS. (I am naming here only the folders that are important for us right now). The “DRIVERS” subfolder holds all the printer drivers installed on the local print server and the “PRINTERS” folder will hold all the queued print jobs.

In the “PRINTERS” subfolder you will usually see some files with the “.shd” extension os “.spl” extension. The “.shd” extension files provide information about which printer the print job was sent to and from whom the print job came. The “.spl” extension it’s the drawing command sent to the printer. Each print job will usually generate 2 files each with the “.slp” and “.shd” extension.

Print Spooler Service

The Print Spooler Service loads files into memory for later printing. All the print jobs go trough the Print Spooler service before they are actually sent out to the printer. If this service is not running on the machine, you will not be able to print. To locate the service simply go to Start > Run, and type “services.msc” then hit Enter. A new window will pop-up and show you a list of services running on the machine. On the right side you will be able to see a service simply called “Print Spooler”. It’s essential that this service is running and the startup type is set to “Automatic”.

In order to be sure that our Print Spooler service its always available and running, we can take some recovery actions in case of a service crash. Right click on the “Print Spooler” service, select “Properties” and go to the “Recovery” tab. Set “Restart the Service” in case of First, Second and Third failure.

You can also check this article on “Fixing Windows 7 HP Print Problems” where i went a bit deeper into the registry keys regarding the Printer Spooler problem.

Printer Drivers

The Printer Driver is actually a small program/software that enables an application to communicate with the printer and sending the print jobs to the printer in a language the printer understands. Each printer manufacturer will also produce printer drivers for their printers for different operating system. The Printer Drivers are located in the “C:\Windows\System32\spool\drivers” folder and you can check what printer drivers are installed on the system by checking the Print Server properties under the “Drivers” tab. Go to Start > Devices and Printers. Select an available printer, then on the top bar select “Print Server Properties”.

Here you will see what printer drivers are installed on the system. Uninstall any unnecessary print drivers or any old and depreciated ones that you might not need. From here you can also install new Printer Drivers by pressing the “Add” button.

You may also want to check the spool folder permissions located at “C:\Windows\System32\spool”. The default permissions should be: Creator Owner (Special), SYSTEM (Full), Administrator (Full), Users (Read & Execute, List , Read), Trusted Installer (List Folders and Contents). Also the “drivers” folder located at “C:\Windows\System32\spool\drivers” should have by default the same permissions.

Troubleshooting Windows 7 Print Server Problems by taking a look at the most common factors that will cause your Print Spooler service to crash.

Troubleshooting Windows 7 Print Server Problems

Now that we have identified the key components we are going to monitor we can get started with the actual troubleshooting. Usually the most common print problem is caused by the “Print Spooler” service being stopped or crashed because it encountered a problem. The most common printing problems are caused by: Insufficient disk space, Incorrect Drivers installed on the system or Incorrect Printer Setting, Windows registry problems, Malware and Spyware

We presume that you are trying to print a document to the printer and nothing happens or the Print Spooler simply crashes whenever you try to print.

The best place to start troubleshooting for “Print Spooler” problems is the Windows Event Viewer. Go to Start > Run, and type “Eventvwr.msc” then hit Enter. The Windows Event Viewer will open. Go to the “Windows Logs” and look on the “Application” log and the “System” log for any print related errors and warnings. You can eventually filter the evens by “Critical”, “Warning” and “Error” event level.

Disk Space and Corrupted Print Jobs

You should check whether you have sufficient disk space or if any corrupted print jobs are still in queue and will cause your Print Spooler service to hang or crash. Each print job will generate some files on your “C:\Windows\System32\Spool\Printers” folder and if this files are not deleted automatically by the system, at one point, your hard drive might become full and there will be no more space to queue any print jobs. In order to delete these files we will first need to stop the print spooler service (if it’s not already stopped or crashed). Go to Start > Run and type “services.msc”. find the “Print Spooler” service and stop the service. Then navigate to “C:\Windows\System32\Spool\Printers” and delete all the files in this folder. By doing so you will empty the print spooler queue and delete any remaining print jobs. Try to start the “Print Spooler” service again.

As an alternative you can stop the spooler service, delete the files, and start it again from the command prompt:

net stop spooler

del /q %systemroot%\system32\spool\printers\*.*

net start spooler

Incorrect Print Drivers or Printer Settings

The most common problem that will cause the Windows 7 Print Spooler to crash or stop responding are the incorrect or outdated printer drivers.

If you have more than one printer installed on the Windows 7, we can try determining which printer causes the problem and why:

  • Try printing the same document on another printer. Still the same problem? If not it could be printer driver.
  • Try printing other document on the same printer. Still problems also with this document? This could be a problem with the document formatting.
  • Try changing the printer driver with a newer or sometimes older printer driver.
  • If your driver it’s a PCL5 driver try with a PCL6 or Post Script printer driver or the other way around and see if it will make any difference.

Drivers can get old and depreciated and they should always be kept up to date. Normally Windows 7 will install the default drivers to any plug and play printer you install into your system and they might not be the best or the most recent ones. Go to the manufacturer website and download the newest printer drivers for you printer and replace the old drivers. After replacing the drivers try to restart the print spooler and print again. Try a different document also and see if the problem still occurs with other type of documents. Check the properties of the printer and try to “Print Directly to the Printer” and see if the error still occurs. You can also disable the “Enable advanced printing features”.

ALWAYS check the Event Viewer for errors after an unsuccessful print job as the event viewer [1] can tell you more about the cause of the crash.

Less Common Print Spooler Problems

Windows Registry Problems

You might also have some Windows Registry problems and I recommend getting a Registry Cleaner software and try to clean up your registry. This can also be a less common problem for the Print Spooler problem. If you think you might have a registry problem you could use something like AML Registry Cleaner and try to fix your problem. Restart the machine and see if this helped.

Malware and Spyware

This can also be a less common problem for the Windows 7 Print Spooler problems and you should always keep your system up to date with the newest updates from Microsoft plus install an anti malware software and scan your system frequently. I recommend Malwarebytes as it should take care of the newest threats. There are quite a few malware and spyware programs out there that would try to take advantage of the Print Spooler service in order to infect the system as the Print Spooler service is installed by default on all the Windows 7 machines and it’s practically used by every user that has a printer.

Other Problems

Other problems may appear because of the incorrect document formatting, when you try to print an A3 document on an A4 paper without the proper scaling. A print job that might be too big for the printer spooler or trying to force the print of a Color document on a text only generic printer, a system that is too low on virtual memory and many others that usually would appear as an error or warning in the Windows Event Viewer.

If you experience problems when printing PDF files or if the printer pauses when printing this is a good sign of wrong drivers. It’s well known that when printing PDF files the printer might pause for long time between the pages and it’s because of the drivers. Try to replace the drivers with PCL5 drivers to see if this solves your problem.

In case of extreme failure and when you are really unable to solve the problems by replacing the driver or checking the printer settings, you can always try a system restore and see if that helps.

Windows Registry Problems

You might also have some Windows Registry problems and I recommend getting a Registry Cleaner software and try to clean up your registry. This can also be a less common problem for the Print Spooler problem. If you think you might have a registry problem you could use something like AML Registry Cleaner and try to fix your problem. Restart the machine and see if this helped.

Malware and Spyware

This can also be a less common problem for the Windows 7 Print Spooler problems and you should always keep your system up to date with the newest updates from Microsoft plus install an anti malware software and scan your system frequently. I recommend Malwarebytes as it should take care of the newest threats. There are quite a few malware and spyware programs out there that would try to take advantage of the Print Spooler service in order to infect the system as the Print Spooler service is installed by default on all the Windows 7 machines and it’s practically used by every user that has a printer.

Other Problems

Other problems may appear because of the incorrect document formatting, when you try to print an A3 document on an A4 paper without the proper scaling. A print job that might be too big for the printer spooler or trying to force the print of a Color document on a text only generic printer, a system that is too low on virtual memory and many others that usually would appear as an error or warning in the Windows Event Viewer.

If you experience problems when printing PDF files or if the printer pauses when printing this is a good sign of wrong drivers. It’s well known that when printing PDF files the printer might pause for long time between the pages and it’s because of the drivers. Try to replace the drivers with PCL5 drivers to see if this solves your problem.

In case of extreme failure and when you are really unable to solve the problems by replacing the driver or checking the printer settings, you can always try a system restore and see if that helps.

Summary

As we can see there are many factors that can affect the printing services on the Microsoft Windows 7 Operating system and I have enumerated the most common ones. To summarize the article lets make a check list with the things you will have to look after when trying to solve Windows 7 Print Spooler issues:

  • ALWAYS check the event viewer for Errors and Warnings related to the Print Spooler, Printer Drivers or any kind of print related events. The Event viewer is the most important tool you have in helping you determine what the problem is. It will tell you what happened, when it happened, and what caused the crash whether it’s a driver problem, document formatting or any other issue within the printing system.
  • Use the latest drivers from you manufacturer. If you have a Printer Spooler crash, try to REMOVE the older driver first before you install the new driver. In this way you can avoid any conflicts that may appear. Check the event viewer before and after the installation of the new drivers and see if you have any kind of errors there.
  • Keep your windows updated and free of Viruses, Malware, Spyware or Worms of any kind by using Microsoft Update services, installing an Anti Virus on your system and check and clean your system with an Anti Malware software.

You can also try to use the Microsoft Fix It Solution Center located here: http://support.microsoft.com/fixit/

Select your Operating system, then select “Print, Fax, Scan, Share or save” in the problem area and select “Print” on the right pane then press the “Run Now” button. A file will be downloaded from the Microsoft site and you will have to run it on your system in order to identify possible print problems.

If even this does not help you with the problem, you are more than welcome to leave a comment to this article with your specific Print Spooler problems and I will try my best to guide you trough in order to find the cause of the problem.


[1] Note: After changing the printer driver it’s always a good practice to try and restart the Print Spooler service and check the queue folder for any un-printed documents. (* Not always recommended if we are talking about a Windows Print server that has multiple printers shared for multiple client computers)

Thanks to vNetWise, he has written this post on may 26, 2012.
The original post can be found here

I have had to deal with some networks in the past where wireless was perhaps not treated with the proper amount of concern.  I know of at least a few where the basic premise to security is just a WPA2 password – that hopefully the users don’t know.  It can’t be changed regularly because you’d have to communicate this change out to everyone.  A user with local administrator rights and Windows 7 can simply check the “show password” box on the WPA password settings, and it will show them.  Compound this with not changing passwords when a user leaves the company and you leave a fairly big hole in the side of your network.  Even worse is relying on MAC security, as this can be spoofed just by sitting there long enough and watching the packets go by and picking a MAC you want to use.

So what’s the solution?  WPA2-EAP using RADIUS, SSL via an Active Directory Certificate Authority, and GPO’s.  The general overview of what you are wanting to set up here and wanting to accomplish, is this:

  • The computer must be a domain computer and trusted.
  • The computer will, via GPO, auto-enroll for a computer based certificate.
  • AD CS will provide said certificate.  This will allow for the computer to be trusted beyond simply its SID or hostname, etc.
  • Wireless settings will be pushed out to all systems via GPO.  No one wants to go to 20 computers and enter a new SSID or configuration.  This should be automatic.  If you add a new access point or a new office, it should publish to the computer (assuming you want this – you might want to use security groups to limit who can use what AP’s in what locations, etc).
  • We don’t want users messing with the wireless settings at all.
  • There should be no password for a user to share, shoulder surf, remember, etc.
  • The user is not what we’re trusting but the computer.  This prevents the user from finding a way to use their credentials to authorize a non-domain computer by sharing, and walking away.
  • Because the computer is authenticating, it is connected as soon as the WiFi is available at boot up, even before the login.  This means that GPO’s and software deployments, etc, can be taking effect even if the machine sits at the login screen.  Contrast this with the situation where the user must login using cached credentials, then connect to the network, and then run any of these tools.  Also, a user who has no cached credentials from a previous login, can login and create a profile.

So some pre-requisites and reference links:

  • You’ve configured an Enterprise PKI for your network similar to how I have described before – Enterprise CA PKI for Domains – 2 Tier, with Root & Subordinate
  • A handy primer on how to do this – http://community.spiceworks.com/how_to/show/1455
  • WAP’s capable of using WPA2-Enterprise and RADIUS (my Netgear WNDR-3700v2 with DD-WRT will)
  • Create any groups in AD if you want to restrict access to certain computers or users in your domain.  The most likely reason you would do this is if you wanted to create say a “grpAllowedWiFi-OfficeName” per office, and then you chose which computers had access to which office.  I’m going to assume here that we are giving access to the entire network from all domain computers, as this is probably most likely.

And now the steps – there is very little that is different from the SpiceWorks HOWTO post by Tino Todino.

1) Configure your Wireless Access Point.

We’re going to do this with a DD-WRT device, as this configuration should translate well regardless of device and if your device doesn’t do it, you might be able to use DD-WRT devices to deal with this.

Click on WIRELESS –> BASIC SETTINGS.

image

I have created a Virtual Interface for this access point, so that I can do this testing in parallel with what I already have in place.  Set it as an AP and give it a name – case matters, and you may want this SSID to be generic through your infrastructure.  I have also chosen to not broadcast the SSID.  This is security through obscurity, but every little bit helps.  Plus because we are going to publish these out to computers via GPO, we don’t have to worry about end-user usability.   Click SAVE/APPLY CONFIGURATION.

Click on WIRELESS –> WIRELESS SECURITY.

image

Security mode is going to be WPA2-Enterprise.  WPA Algorithm we’ll set to AES (TKIP I understand can be cracked).   Enter the IP’s and shared secrets of your RADIUS servers.  This shared secret will be used later.   Click SAVE/APPLY CONFIGURATION.

The Wireless Access Point is now configured.

2) Install NPS on the server

I already had NPS installed, but if you followed my setup, you only have the Network Policy Service installed and not the Routing and Remote Access Service

3) Set up RADIUS clients on the NPS

Open the NPS console on the NPS server.  Expand RADIUS CLIENTS AND SERVERS –> RADIUS CLIENTS.  Right click and choose NEW.

image

Enter the friendly name of this WAP, the IP, and the Shared Secret and click OK.  If you have multiple AP’s, repeat this process as needed.

4) Configure 802.1x on the NPS server

In the NPS console, click on the root NPS (Local) option.  On the right hand side from the drop down select “RADIUS server for 802.1x Wireless or Wired connections”.   Then click the green arrow beside “Configure 802.1x”.

image

Select “Secure Wireless Connections” and give it a name.  I’ve named mine “NetWise – Secure Wireless Connections”.  Click NEXT.

image

Select the RADIUS client(s) you want to use this configuration.  To be fair, you could have also added the client here as well I just realize.  Click NEXT.

image

Select Microsoft: Protected EAP (PEAP).  Click CONFIGURE.

image

In my case, my primary RADIUS server also happens to be my Exchange server (I’ll get around to fixing that some day…..).  As such, it has more than one SSL Certificate present.  Select the one for the RADIUS server itself, which will be the one showing the FQDN.  Also it will show “Issued:” by your internal AD CA, vs an external 3rd party.   Click OK

image

Click NEXT.

This is where you would configure USER groups.  Note that this is not groups of Computer objects, so this is not where/how you would restrict ComputerA from using the WAP in CityQ for example.  Click NEXT, as we’re not adding groups in the scope of this document.

image

On the Traffic Controls screen, click NEXT.

image

On the last page, you’ll see confirmation that we have created both a Connection Request Policy and a Network Policy.  Click FINISH.

image

5) Create a Certificate AutoEnrollment GPO.

  • Open the Group Policy Management Console
  • Either create a new GPO or modify an existing one.  I’m choosing to modify my Default Domain Policy as I want this to affect all my computers.  You might choose to create a new one so you could link it to OU’s or computer groups as desired.
  • Under Security Filtering, you would remove the “Authenticated Users” and add in the Computer/User groups if you wanted to do it that way.
  • Edit the GPO (Right Click –> EDIT)
  • Browse to COMPUTER CONFIGURATION –> POLICIES –> WINDOWS SETTINGS –> SECURITY SETTINGS –> PUBLIC KEY POLICIES.
  • Right click on “Certificate Services Client – Autoenrollment” and click PROPERTIES. image
  • Change “Configuration Model” to ENABLED and check both boxes and click OK. image
  • Right click on “Certificate Services Client – Certificate Enrollment Policy” and click PROPERTIES. image
  • Change “Configuration Model” to ENABLED and click OK. image
  • Close the GPO you’re working on to save it.  (I forget this so often, it hurts.)

6) Create a Windows Vista/7 Wireless 802.1x GPO.

  • Edit the GPO in question.  It might very well be the same one from step 5 above.
  • Browse to COMPUTER CONFIGURATION –> POLICIES –> WINDOWS SETTINGS –> SECURITY SETTINGS –> Wireless Network (IEEE 802.11) Policies.
  • Right click and choose “Create a new wireless network policy for Windows Vista and later release”.image Note: if you don’t see this, you might already have a policy configured for Vista.  If so, you will only get the option for the Windows XP policy.  But you can only have one of each per GPO.   This could be a good design reason to want to keep the GPO’s with the policies separate from your Default Domain Policy, if you are intending to have a configuration that is not standard across the board.
  • Give your policy a name and a description, and then click ADD –> INFRASTRUCTURE. image
  • Give your profile a Profile Name (ie: NETWISE CORPORATE).  Type in the name of your SSID and click ADD.  I have to assume you could put in multiples here if perhaps your SSID’s were setup like NW-<CITY> or NW-<LOC_CODE>, etc. image Check all 3 boxes: “Connect automatically…”, “Connect to a more preferred….” (more on this later!) and “Connect even if….”.  Click the SECURITY tab.
  • On the SECURITY tab, set AUTHENTICATION=”WPA2-Enterprise”, ENCRYPTION=”AES” (to match what you setup on the WAP itself), NETWORK AUTHENTICATION METHOD=”(PEAP)” and change AUTHENTICATION MODE=”COMPUTER AUTHENTICATION”.image Click PROPERTIES next to (PEAP).
  • Check the box for “VALIDATE SERVER CERTIFICATES”.  Check the box for “CONNECT TO THESE SERVERS:” and enter the FQDN name(s) of your RADIUS servers to use for this policy, separated by a semi-colon if needed.  In the TRUSTED ROOT CERTIFICATION AUTHORITIES list, find and check the certificate for your Enterprise Root CA. image Click OK twice to return to the 802.11 Wireless Network Policy Properties window.
  • Click on the NETWORK PERMISSIONS tab.
  • If you want to get more granular, this is where you have some greater control over the wireless settings on the client.   Some specific options:
    • You can click ADD and enter an Infrastructure/Ad-Hoc SSID and choose to allow or deny.  This is where you might add a known public SSID that you don’t want users to use (ie: “Linksys” or “Starbucks” or something.).
    • Check boxes for “Prevent connections to ad-hoc/infrastructure networks”.
    • If you’re going to prevent said access, then you might want to uncheck “Allow user to view denied networks” – this would make them simply not show up at all.
    • “Only use Group Policy profiles” locks the WiFi lists on the client down to ONLY what you have configured in Group Policy – they cannot add anything additional.  This seems pretty drastic, but it is a nice option to have.
  • Click OK
  • Close the GPO to save it.

7) On a client that might already be connected via a WPA2 configuration or wired, refresh the group policies (gpupdate /force) and let it run.  If you have to log off or reboot, do so.

image

Once it applies, you’ll see that your new options are present.  Do note that you see the wireless configuration friendly name “NETWISE CORPORATE” vs the SSID of “NETWISE-ENT”.  Also, because of the check boxes when creating the GPO Wireless Policy of “Connect to a more preferred network….” you will note that I’ve stayed connected to my 802.11n 5GHz AP/SSID vs switching over to NETWISE CORPORATE automatically.  Depending on your environment, you may then want to modify this in the GPO.  Perhaps your office is next to a Starbucks and maybe they even have better signal strength on that side of your office.  This setting would tell the computer to connect to the corporate network any time it is available.

8) Troubleshooting.

Are you seeing this: image

Remember the part where I said the NPS I was on had more than one SSL certificate?  If you pick the wrong one, and the FQDN and such don’t match, you’re going to get this error.  To remedy it:

  • If you’re working wirelessless, you should TERMINATE and connect to either another WPA2 based SSID or a wireled link.
  • Connect back to your RADIUS/NPS server(s)
  • In the NPS console, click on POLICIES –> NETWORK POLICIES.  Select the Secure Wireless Connections policy (with the appropriate name) and right click and choose PROPERTIES. image
  • Click on the CONTSTRAINTS tab image
  • Select the EAP type listed (there should be only one) and click EDIT. image
  • On the EAP Protected EAP Properties window, ensure that Certificate Issued: is showing the FQDN of the server as entered in the RADIUS properies previously and shows ISSUER: as your Enterprise Root CA.  Click OK twice to finish editing.
  • Do this on both (or more) of your NPS/RADIUS servers
  • Retry your connection.

Now, to wrap up.  Once you’re connected if you want, you can right click on the connection in the WiFi list and choose PROPERTIES: image

You will note that everything is grayed out and un-modifiable:

imageimage

So what we have is exactly what we set out to get.  No WPA2 passwords that can be shared.  We’re using PKI/SSL/ADCS/GPO to deploy the security so no one ever has to touch the machine(s).

Design a site like this with WordPress.com
Get started